Creating Custom Widgets
Let's create a smart socket widget socket_widget.yaml. A widget that will control the socket state and parameters.
Widget Structure
Let's create a socket folder in the widgets folder of our project, and inside it a socket_widget.yaml file. In our example, the widget will consist of 4 main blocks:
substitutions:     # Static variables, constants
sensor:            # Numeric sensors from Home Assistant
text_sensor:       # Text sensors from Home Assistant
lvgl:              # Visual interface
Substitutions - variables/constants
Purpose: Make the widget reusable with different parameters.
Since we specify the same data in many places in the code, it's easier to use one constant and specify it everywhere else in the code.
First, we need the entity name from Home Assistant. In my case it's switch.rozetka_test_socket, as well as 3 sensors with power, voltage and current. In my case these are:
sensor.rozetka_test_power   # Power
sensor.rozetka_test_voltage # Voltage
sensor.rozetka_test_current # Current
Let's add the socket_entity variable to use it later instead of switch.rozetka_test_socket and our three sensors
substitutions:

  socket_entity:  "switch.rozetka_test_socket"
  socket_power:   "sensor.rozetka_test_power"   # Power
  socket_voltage: "sensor.rozetka_test_voltage" # Voltage
  socket_current: "sensor.rozetka_test_current" # Current
We'll also need 4 icons from the MDI set and our substitutions block will look like this:
substitutions:

  socket_entity:  "switch.rozetka_test_socket"
  socket_power:   "sensor.rozetka_test_power"   # Power
  socket_voltage: "sensor.rozetka_test_voltage" # Voltage
  socket_current: "sensor.rozetka_test_current" # Current

  socket_icon:          "\U000F1107"
  socket_current_icon:  "\U000F1480"
  socket_voltage_icon:  "\U000F095B"
  socket_power_icon:    "\U000F0241"
For the icons to display, we need to be added to the fonts.yaml fonts
- file: "fonts/materialdesignicons-webfont.ttf"
  id: mdi_icons_40
  size: 40
  bpp: 4
  glyphs: [
    "\U000F1107", # socket
    "\U000F1480", # current
    "\U000F095B", # voltage
    "\U000F0241", # power
    "\U000F068A", # shield home
    "\U000F1828", # shield moon
    "\U000F099D", # shield lock
    "\U000F06BB", # shield plane
    "\U000F099E", # shield off
    "\U000F0498", # shield
  ]

- file: "fonts/materialdesignicons-webfont.ttf"
  id: mdi_icons_160
  size: 160
  bpp: 4
  glyphs: [
    "\U000F1107", # socket
  ]
Text Sensors - text sensors
Purpose: Get text data from Home Assistant.
To get information from Home Assistant text sensors, we need to create text sensors text_sensor. We need to get:
- object state
- object name
- units of measurement for power, voltage and current
Object state
text_sensor:

  # Socket state
  - platform: homeassistant        # Specify Home Assistant platform
    id: socket_sensor_state        # Come up with a unique identifier for linking in code
    entity_id: "${socket_entity}"  # Specify the constant of our entity from substitutions
Object name
  # Socket name
  - platform: homeassistant
    id: socket_sensor_name
    entity_id: "${socket_entity}"
    attribute: friendly_name      # Specify entity attribute
Units of measurement for power, voltage and current
    # Power units of measurement
  - platform: homeassistant
    id: socket_sensor_power_uom
    entity_id: "${socket_power}"
    attribute: unit_of_measurement

    # Voltage units of measurement
  - platform: homeassistant
    id: socket_sensor_voltage_uom
    entity_id: "${socket_voltage}"
    attribute: unit_of_measurement

    # Current units of measurement
  - platform: homeassistant
    id: socket_sensor_current_uom
    entity_id: "${socket_current}"
    attribute: unit_of_measurement
So, we now have the following text_sensor section (but we'll come back to it):
text_sensor:

  # Socket state
  - platform: homeassistant
    id: socket_sensor_state
    entity_id: "${socket_entity}"

  # Socket name
  - platform: homeassistant
    id: socket_sensor_name
    entity_id: "${socket_entity}"
    attribute: friendly_name

  # Power units of measurement
  - platform: homeassistant
    id: socket_sensor_power_uom
    entity_id: "${socket_power}"
    attribute: unit_of_measurement

  # Voltage units of measurement
  - platform: homeassistant
    id: socket_sensor_voltage_uom
    entity_id: "${socket_voltage}"
    attribute: unit_of_measurement

  # Current units of measurement
  - platform: homeassistant
    id: socket_sensor_current_uom
    entity_id: "${socket_current}"
    attribute: unit_of_measurement
Sensors - numeric sensors
Purpose: Get numeric data from Home Assistant.
To get information from Home Assistant numeric sensors, we need to create numeric sensors sensor We need to get values from power, voltage and current sensors:
sensor:
    # Power value
  - platform: homeassistant
    id: socket_sensor_power
    entity_id: "${socket_power}"

    # Voltage value
  - platform: homeassistant
    id: socket_sensor_voltage
    entity_id: "${socket_voltage}"

    # Current value
  - platform: homeassistant
    id: socket_sensor_current
    entity_id: "${socket_current}"
We'll also come back to them later to define actions when receiving values from sensors.
LVGL Interface
Purpose: Creates the visual interface of the widget.
Page Structure:
To match the design of our firmware, we'll create a page with 7 blocks:
lvgl:
  pages:
    - id: socket_page                 # Unique page identifier
      bg_color: color_slate_blue_gray # Background color
      widgets:                        # List of widgets

        # Object with state
        - obj:
            id: socket_state
            x: 20
            y: 20
            width: 440
            height: 60
            align: top_left
            pad_all: 0
            bg_color: color_steel_blue
            bg_opa: 20%
            border_opa: transp
            border_width: 0
            shadow_opa: transp
            radius: 10

        # Object with socket on/off button
        - obj:
            id: socket_icon_bg
            x: 20
            y: 100
            width: 210
            height: 280
            align: top_left
            pad_all: 0
            bg_color: color_steel_blue
            bg_opa: 20%
            border_opa: transp
            border_width: 0
            shadow_opa: transp
            radius: 10

        # Object with power indicator
        - obj:
            id: socket_power_bg
            x: 250
            y: 100
            width: 210
            height: 80
            align: top_left
            pad_all: 0
            bg_color: color_steel_blue
            bg_opa: 20%
            border_opa: transp
            border_width: 0
            shadow_opa: transp
            radius: 10

        # Object with voltage indicator
        - obj:
            id: socket_voltage_bg
            x: 250
            y: 200
            width: 210
            height: 80
            align: top_left
            pad_all: 0
            bg_color: color_steel_blue
            bg_opa: 20%
            border_opa: transp
            border_width: 0
            shadow_opa: transp
            radius: 10

        # Object with current indicator
        - obj:
            id: socket_current_bg
            x: 250
            y: 300
            width: 210
            height: 80
            align: top_left
            pad_all: 0
            bg_color: color_steel_blue
            bg_opa: 20%
            border_opa: transp
            border_width: 0
            shadow_opa: transp
            radius: 10

        # Back button
        - obj:
            id: socket_back_bg
            x: 20
            y: 400
            width: 60
            height: 60
            align: top_left
            pad_all: 0
            bg_color: color_steel_blue
            bg_opa: 20%
            border_opa: transp
            border_width: 0
            shadow_opa: transp
            radius: 10

        # Name
        - obj:
            id: socket_name_bg
            x: 100
            y: 400
            width: 360
            height: 60
            align: top_left
            pad_all: 0
            bg_color: color_steel_blue
            bg_opa: 20%
            border_opa: transp
            border_width: 0
            shadow_opa: transp
            radius: 10
All objects have the same structure but different sizes and coordinates, for example:
- obj:
    id: socket_state             # Unique widget identifier
    x: 20                        # X coordinate
    y: 20                        # Y coordinate
    width: 440                   # Widget width in pixels
    height: 60                   # Widget height in pixels
    align: top_left              # Alignment (top left)
    pad_all: 0                   # Remove all padding
    bg_color: color_steel_blue   # Background color
    bg_opa: 20%                  # Background opacity
    border_opa: transp           # Border opacity (full transparency)
    border_width: 0              # Border thickness
    shadow_opa: transp           # Shadow opacity (full transparency)
    radius: 10                   # Round corners
Now we need to fill our blocks with content
State Block
Add text to our block that will display the socket state (on or off):
# Object with state
- obj:
    id: socket_state
    x: 20
    y: 20
    width: 440
    height: 60
    align: top_left
    pad_all: 0
    bg_color: color_steel_blue
    bg_opa: 20%
    border_opa: transp
    border_width: 0
    shadow_opa: transp
    radius: 10
    widgets:
      - label:                           # Text widget
          id: socket_state_label         # Unique identifier
          align: center                  # Alignment relative to our block, not the page
          text_font: nunito_18           # Font (size)
          text_color: color_misty_blue   # Font color
          text: " "                      # Text (leave empty, will pass through action)
Now let's go back to the sensor responsible for the state. Add an action to it (what to do when receiving a value in the sensor):
text_sensor:

  # Socket state
  - platform: homeassistant
    id: socket_sensor_state
    entity_id: "${socket_entity}"
    on_value:
      - lvgl.label.update:
          id: socket_state_label
          text: !lambda return x;

      - if:
          condition:
            lambda: 'return x == "on";'
          then:
            - lvgl.label.update:
                id: socket_icon_label
                text_color: color_yellow
          else:
            - lvgl.label.update:
                id: socket_icon_label
                text_color: color_misty_blue
Add on_value (when receiving a value), specify to do two actions:
- Update the widget with id
socket_state_label. Pass it the valuex(raw sensor value) intextinstead of the empty one we set - Update the widget with id
socket_icon_label. Pass it a color depending on the state. In other words, here's a condition: if the state sensor receives the valueon, the icon becomes yellow, otherwise the color will becolor_misty_blue
Button Block with Indication
Add text (icon) to our block with socket state indication (on or off):
# Object with socket on/off button
- obj:
    id: socket_icon_bg
    x: 20
    y: 100
    width: 210
    height: 280
    align: top_left
    pad_all: 0
    bg_color: color_steel_blue
    bg_opa: 20%
    border_opa: transp
    border_width: 0
    shadow_opa: transp
    radius: 10
    widgets:
      - label:
          id: socket_icon_label
          align: center
          text_font: mdi_icons_160
          text_color: color_misty_blue
          text: "${socket_icon}"
Make the block a button by calling the home assistant service switch.toggle
# Object with socket on/off button
- obj:
    id: socket_icon_bg
    x: 20
    y: 100
    width: 210
    height: 280
    align: top_left
    pad_all: 0
    bg_color: color_steel_blue
    bg_opa: 20%
    border_opa: transp
    border_width: 0
    shadow_opa: transp
    radius: 10
    widgets:
      - label:
          id: socket_icon_label
          align: center
          text_font: mdi_icons_160
          text_color: color_misty_blue
          text: "${socket_icon}"
    on_click:                               # Click action
      - homeassistant.action:               # Call Home Assistant service
          action: switch.toggle             # Service name (switch toggle)
          data:
            entity_id: "${socket_entity}".  # Our entity
In the previous section, we already added an action to this widget to change the icon color.
Blocks with Power, Voltage and Current Indication
Add 3 texts to our power block:
- icon
- value
- units of measurement
# Object with power indicator
- obj:
    id: socket_power_bg
    x: 250
    y: 100
    width: 210
    height: 80
    align: top_left
    pad_all: 0
    bg_color: color_steel_blue
    bg_opa: 20%
    border_opa: transp
    border_width: 0
    shadow_opa: transp
    radius: 10
    widgets:
      - label:
          id: socket_power_icon_label
          x: 10                             # Small left margin
          align: left_mid
          text_font: mdi_icons_40           # Icon font
          text_color: color_misty_blue
          text: "${socket_power_icon}"      # Icon from substitutions
      - label:
          id: socket_power_state_label
          x: 70                             # Margin from icon
          align: left_mid
          text_font: nunito_18
          text_color: color_misty_blue
          text: " "                         # Empty field, will pass through action
      - label:
          id: socket_power_state_uom_label
          x: 140                            # Margin from icon
          align: left_mid
          text_font: nunito_18
          text_color: color_misty_blue
          text: " "                         # Empty field, will pass through action
Go back to our power sensors and add actions to them:
text_sensor:
  # Power units of measurement
  - platform: homeassistant
    id: socket_sensor_power_uom
    entity_id: "${socket_power}"
    attribute: unit_of_measurement
    on_value:
      - lvgl.label.update:
          id: socket_power_state_uom_label
          text: !lambda return x;
sensor:
    # Power value
  - platform: homeassistant
    id: socket_sensor_power
    entity_id: "${socket_power}"
    on_value:
      - lvgl.label.update:
          id: socket_power_state_label
          text: !lambda |-
            if (isnan(x)) return "N/A";
            char buf[16];
            snprintf(buf, sizeof(buf), "%.1f", x);
            return buf;
While the first sensor is straightforward, the second one might raise questions. Let me explain what's happening here:
if (isnan(x)) return "N/A";
char buf[16];
snprintf(buf, sizeof(buf), "%.1f", x);
return buf;
Check for non-numeric value:
cppif (isnan(x)) return "N/A";isnan(x)- Checks if valuexis not a number (NaN)return "N/A"- Returns "N/A" if value is invalid
Create buffer:
cppchar buf[16];- Creates a character buffer of 16 bytes
- Sufficient for storing numbers in format
-123456.789
Formatted output:
cppsnprintf(buf, sizeof(buf), "%.1f", x);Parameter Description bufBuffer for writing result sizeof(buf)Maximum data size (16 bytes) "%.1f"Format template (1 decimal place) xInput sensor value Return result:
cpp// Returns formatted string return buf;
For different sensors use:
// For power and voltage (1 decimal place)
snprintf(buf, sizeof(buf), "%.1f", x);

// For current (3 decimal places)
snprintf(buf, sizeof(buf), "%.3f", x);
Conversion Examples
| Input value | Format | Result |
|---|---|---|
23.456789 | %.1f | 23.5 |
0.123456 | %.3f | 0.123 |
NaN | - | N/A |
Voltage and current work the same way
Block with Menu Return Button
Add text with icon and click action:
# Back button
- obj:
    id: socket_back_bg
    x: 20
    y: 400
    width: 60
    height: 60
    align: top_left
    pad_all: 0
    bg_color: color_steel_blue
    bg_opa: 20%
    border_opa: transp
    border_width: 0
    shadow_opa: transp
    radius: 10
    widgets:
      - label:
          id: socket_back_label
          align: center
          text_font: icons_28
          text_color: color_misty_blue
          text: "${exit_icon}"
    on_press:
      - lvgl.page.show: devices_page           # Show Devices page instead of current one
      - lvgl.widget.show: menu_controls_main   # Show menu buttons
Block with Entity Name
Add text:
# Name
- obj:
    id: socket_name_bg
    x: 100
    y: 400
    width: 360
    height: 60
    align: top_left
    pad_all: 0
    bg_color: color_steel_blue
    bg_opa: 20%
    border_opa: transp
    border_width: 0
    shadow_opa: transp
    radius: 10
    widgets:
      - label:
          id: socket_name_label
          align: center
          text_font: nunito_18
          text_color: color_misty_blue
          text: "friendly name"
Go back to the name sensor and add action:
  # Socket name
  - platform: homeassistant
    id: socket_sensor_name
    entity_id: "${socket_entity}"
    attribute: friendly_name
    on_value:
      - lvgl.label.update:
          id: socket_name_label
          text: !lambda return x;
Final Code of Our Widget
substitutions:
socket_entity: "switch.rozetka_test_socket"
socket_power: "sensor.rozetka_test_power" # Power
socket_voltage: "sensor.rozetka_test_voltage" # Voltage
socket_current: "sensor.rozetka_test_current" # Current
socket_icon: "\U000F1107"
socket_current_icon: "\U000F1480"
socket_voltage_icon: "\U000F095B"
socket_power_icon: "\U000F0241"
text_sensor:
# Socket state
- platform: homeassistant
id: socket_sensor_state
entity_id: "${socket_entity}"
on_value:
- lvgl.label.update:
id: socket_state_label
text: !lambda return x;
- if:
condition:
lambda: 'return x == "on";'
then:
- lvgl.label.update:
id: socket_icon_label
text_color: color_yellow
else:
- lvgl.label.update:
id: socket_icon_label
text_color: color_misty_blue
# Socket name
- platform: homeassistant
id: socket_sensor_name
entity_id: "${socket_entity}"
attribute: friendly_name
on_value:
- lvgl.label.update:
id: socket_name_label
text: !lambda return x;
# Power units of measurement
- platform: homeassistant
id: socket_sensor_power_uom
entity_id: "${socket_power}"
attribute: unit_of_measurement
on_value:
- lvgl.label.update:
id: socket_power_state_uom_label
text: !lambda return x;
# Voltage units of measurement
- platform: homeassistant
id: socket_sensor_voltage_uom
entity_id: "${socket_voltage}"
attribute: unit_of_measurement
on_value:
- lvgl.label.update:
id: socket_voltage_state_uom_label
text: !lambda return x;
# Current units of measurement
- platform: homeassistant
id: socket_sensor_current_uom
entity_id: "${socket_current}"
attribute: unit_of_measurement
on_value:
- lvgl.label.update:
id: socket_current_state_uom_label
text: !lambda return x;
sensor:
# Power value
- platform: homeassistant
id: socket_sensor_power
entity_id: "${socket_power}"
on_value:
- lvgl.label.update:
id: socket_power_state_label
text: !lambda |-
if (isnan(x)) return "N/A";
char buf[16];
snprintf(buf, sizeof(buf), "%.1f", x);
return buf;
# Voltage value
- platform: homeassistant
id: socket_sensor_voltage
entity_id: "${socket_voltage}"
on_value:
- lvgl.label.update:
id: socket_voltage_state_label
text: !lambda |-
if (isnan(x)) return "N/A";
char buf[16];
snprintf(buf, sizeof(buf), "%.1f", x);
return buf;
# Current value
- platform: homeassistant
id: socket_sensor_current
entity_id: "${socket_current}"
on_value:
- lvgl.label.update:
id: socket_current_state_label
text: !lambda |-
if (isnan(x)) return "N/A";
char buf[16];
snprintf(buf, sizeof(buf), "%.3f", x);
return buf;
lvgl:
pages:
- id: socket_page
bg_color: color_slate_blue_gray
widgets:
# Object with state
- obj:
id: socket_state
x: 20
y: 20
width: 440
height: 60
align: top_left
pad_all: 0
bg_color: color_steel_blue
bg_opa: 20%
border_opa: transp
border_width: 0
shadow_opa: transp
radius: 10
widgets:
- label:
id: socket_state_label
align: center
text_font: nunito_18
text_color: color_misty_blue
text: " "
# Object with socket on/off button
- obj:
id: socket_icon_bg
x: 20
y: 100
width: 210
height: 280
align: top_left
pad_all: 0
bg_color: color_steel_blue
bg_opa: 20%
border_opa: transp
border_width: 0
shadow_opa: transp
radius: 10
widgets:
- label:
id: socket_icon_label
align: center
text_font: mdi_icons_160
text_color: color_misty_blue
text: "${socket_icon}"
on_click:
- homeassistant.action:
action: switch.toggle
data:
entity_id: "${socket_entity}"
# Object with power indicator
- obj:
id: socket_power_bg
x: 250
y: 100
width: 210
height: 80
align: top_left
pad_all: 0
bg_color: color_steel_blue
bg_opa: 20%
border_opa: transp
border_width: 0
shadow_opa: transp
radius: 10
widgets:
- label:
id: socket_power_icon_label
x: 10
align: left_mid
text_font: mdi_icons_40
text_color: color_misty_blue
text: "${socket_power_icon}"
- label:
id: socket_power_state_label
x: 70
align: left_mid
text_font: nunito_18
text_color: color_misty_blue
text: " "
- label:
id: socket_power_state_uom_label
x: 140
align: left_mid
text_font: nunito_18
text_color: color_misty_blue
text: " "
# Object with voltage indicator
- obj:
id: socket_voltage_bg
x: 250
y: 200
width: 210
height: 80
align: top_left
pad_all: 0
bg_color: color_steel_blue
bg_opa: 20%
border_opa: transp
border_width: 0
shadow_opa: transp
radius: 10
widgets:
- label:
id: socket_voltage_icon_label
x: 10
align: left_mid
text_font: mdi_icons_40
text_color: color_misty_blue
text: "${socket_voltage_icon}"
- label:
id: socket_voltage_state_label
x: 70
align: left_mid
text_font: nunito_18
text_color: color_misty_blue
text: " "
- label:
id: socket_voltage_state_uom_label
x: 140
align: left_mid
text_font: nunito_18
text_color: color_misty_blue
text: " "
# Object with current indicator
- obj:
id: socket_current_bg
x: 250
y: 300
width: 210
height: 80
align: top_left
pad_all: 0
bg_color: color_steel_blue
bg_opa: 20%
border_opa: transp
border_width: 0
shadow_opa: transp
radius: 10
widgets:
- label:
id: socket_current_icon_label
x: 10
align: left_mid
text_font: mdi_icons_40
text_color: color_misty_blue
text: "${socket_current_icon}"
- label:
id: socket_current_state_label
x: 70
align: left_mid
text_font: nunito_18
text_color: color_misty_blue
text: " "
- label:
id: socket_current_state_uom_label
x: 140
align: left_mid
text_font: nunito_18
text_color: color_misty_blue
text: " "
# Back button
- obj:
id: socket_back_bg
x: 20
y: 400
width: 60
height: 60
align: top_left
pad_all: 0
bg_color: color_steel_blue
bg_opa: 20%
border_opa: transp
border_width: 0
shadow_opa: transp
radius: 10
widgets:
- label:
id: socket_back_label
align: center
text_font: icons_28
text_color: color_misty_blue
text: "${exit_icon}"
on_press:
- lvgl.page.show: devices_page
- lvgl.widget.show: menu_controls_main
# Name
- obj:
id: socket_name_bg
x: 100
y: 400
width: 360
height: 60
align: top_left
pad_all: 0
bg_color: color_steel_blue
bg_opa: 20%
border_opa: transp
border_width: 0
shadow_opa: transp
radius: 10
widgets:
- label:
id: socket_name_label
align: center
text_font: nunito_18
text_color: color_misty_blue
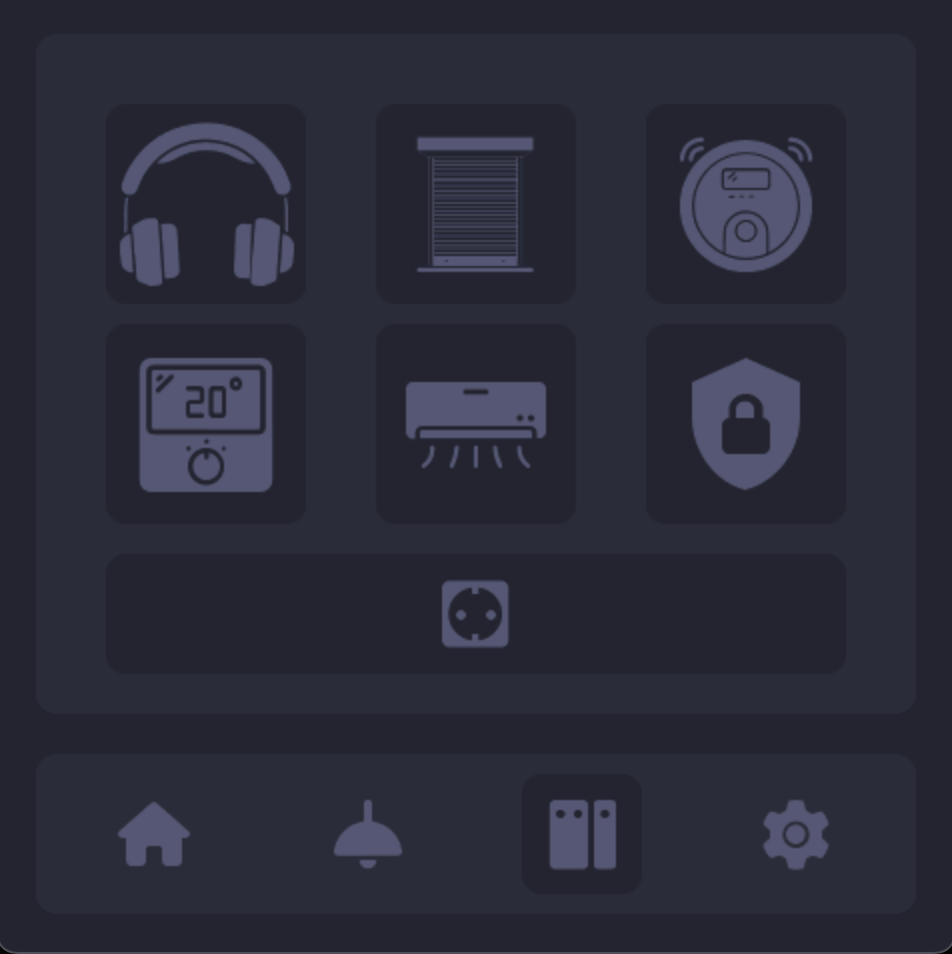
text: "friendly name"Button to Display Widget
So, we've created a widget, but how do we integrate it into the existing firmware? For this we need to connect our widget in devices.yaml and add a navigation button.
Connect the widget
packages:
  media_player: !include media_player/media_player.yaml
  vacuum: !include vacuum/vacuum_widget.yaml
  shutter: !include shutter/shutter_config.yaml
  thermostat: !include thermostat/thermostat_widget.yaml
  air_conditioner: !include air_conditioner/air_conditioner_widget.yaml
  alarm_panel: !include alarm_panel/alarm_panel.yaml
  socket: !include socket/socket_widget.yaml
Connect the button
              - obj:
                  y: 260
                  width: 440
                  height: 60
                  pad_all: 0
                  align: TOP_MID
                  bg_opa: TRANSP
                  shadow_opa: TRANSP
                  border_opa: TRANSP
                  border_width: 0
                  radius: 10
                  widgets:
                    - button:
                        id: socket_page_btn
                        x: 35
                        align: LEFT_MID
                        width: 370
                        height: 60
                        radius: 10
                        bg_color: color_slate_blue_gray
                        shadow_opa: TRANSP
                        widgets:
                          - label:
                              align: CENTER
                              text_color: color_steel_blue
                              text_font: mdi_icons_40
                              text: "${socket_icon}"
                        on_press:
                          - lvgl.widget.hide: menu_controls_main
                          - lvgl.page.show:
                              id: socket_page
                              animation: OUT_RIGHT
                              time: 300ms
IMPORTANT
Pay attention to the number of indentations
Conclusion
Here's the result we achieved:
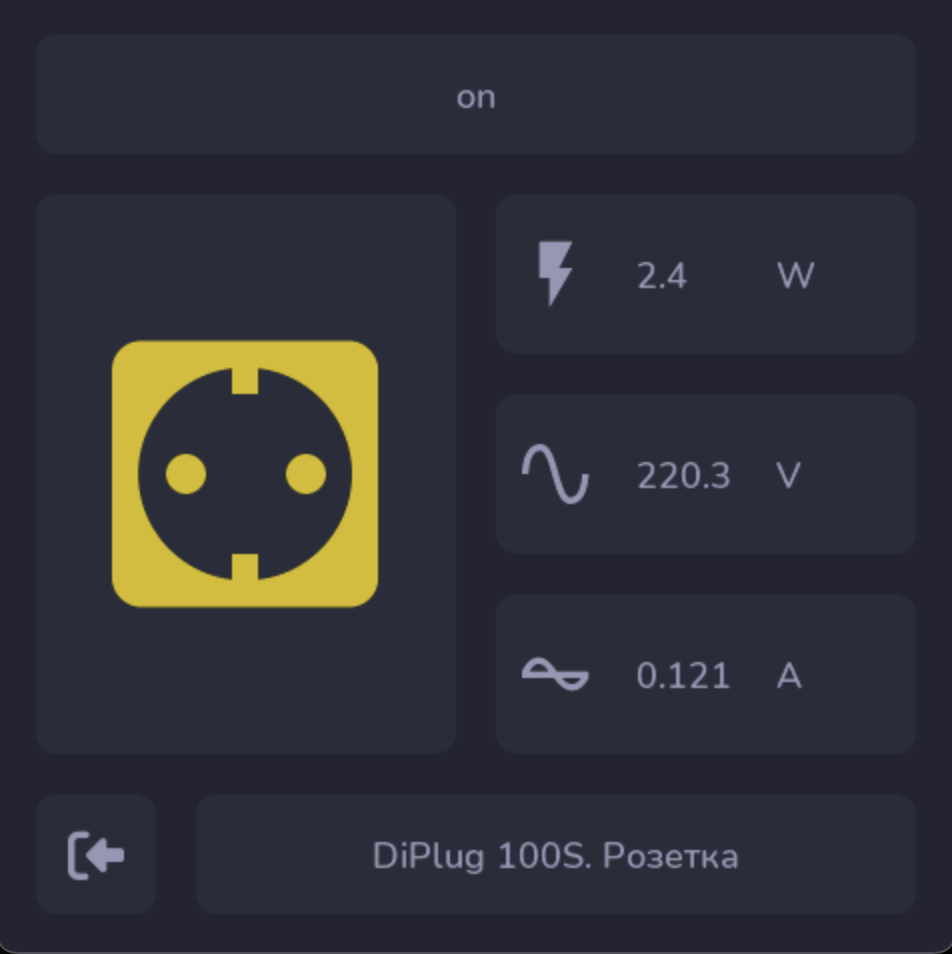
This example demonstrates only a small part of LVGL capabilities in ESPHome and can serve as a foundation for creating more complex and functional user interfaces.